¶ Jockey Pump Settings
Common pump settings that apply to the Jockey, Intermediate, Main, and Well pumps are found here:
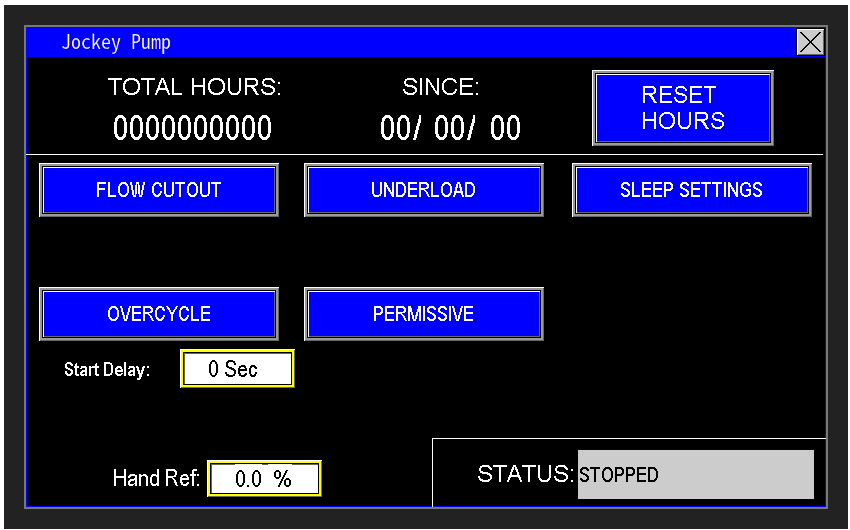
The jockey pump on Omnia systems is used as a pressure maintenance system and is usually used for getting the station to setpoint, and putting the station to sleep. Gain access to the Jockey pump settings by selecting Jockey on the main screen (image 1.0).

The main screen for the jock pump settings (Image 1.1) serves as the central hub for configuring settings to optimize the automation of the Jockey pump. While some settings are exclusive to the Jockey pump, most are applicable to other pumps in the system, making the automation process consistent across them. Certain settings specific to the Jockey pump’s automation, such as those in the Admin Setup section, are preconfigured at the factory based on the station’s design.
¶ Jockey pump run totals
At the top of the screen (Image 1.2), the Motor Data for the Jockey Pump displays the accumulated run time while the motor is active. If the motor or pump is replaced due to a breakdown, the Reset Hours button allows you to reset the Total Hours to zero. Upon pressing this button, the Since date updates to the current date, providing an effective way to track the operational lifespan of each pump or motor.

¶ Start Delay and Status
The Start Delay (Image 1.3) is a customizable timer that adds an extra delay before the Jockey pump starts. The Omnia program includes built-in timers to ensure the Jockey pump’s starting sequence is safe and does not interfere with other station components or automation. If your application requires additional time to enhance the pump station’s performance, this adjustable timer allows you to tailor the delay to meet specific needs.
The Status display indicates the current state of the Jockey pump, such as STOPPED, STARTING, RUNNING, FAULTED, or other relevant states.

|

|
¶ Flow Cutout
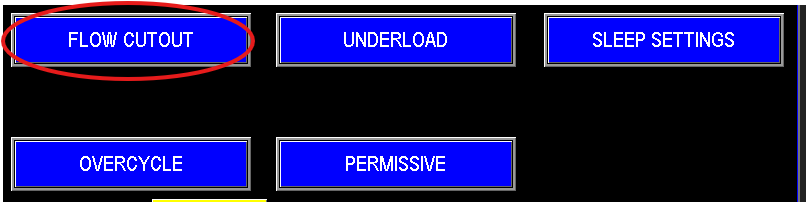
Flow cutout directs to the screen that allows the control of when the jockey should and should not run based on flow (image 1.5).
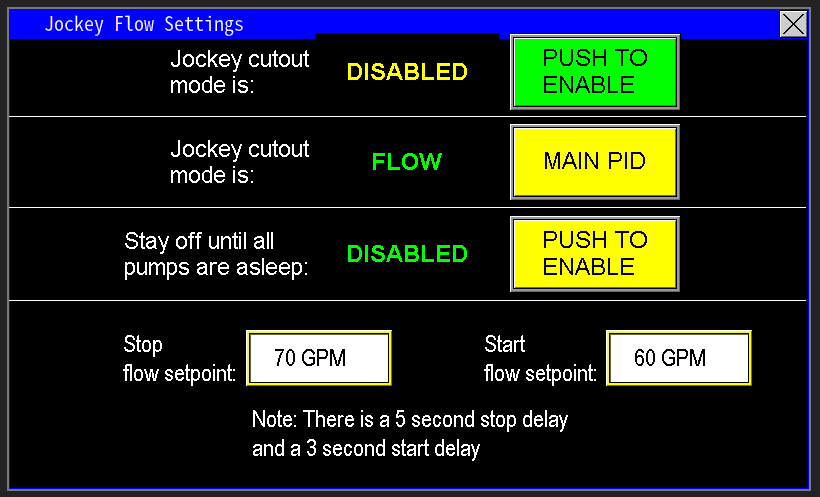
When the Flow Cutout button is pressed, the Jockey Flow Settings screen populates (Image 1.6), allowing customization of the Jockey pump’s automation based on station flow. From this screen, you can Enable or Disable the Cut In and Cut Out features. When enabled, the cutout mode can be set to trigger based on either Flow or PID Output, determining how the Jockey pump enters sleep mode.
The Stay Off Until All Pumps Are Asleep feature further tailors the panel’s operation to the station’s needs. When Disabled, the Jockey pump will restart if the flow drops below the Start Flow Setpoint and follow standard sleep settings and pressure maintenance. When Enabled, the Jockey pump shuts off once the station’s flow exceeds the Stop Flow Setpoint and remains off until all pumps in the station have entered sleep mode—essentially until the entire station is asleep. When water demand returns, the Jockey pump will then activate to assist in waking the station from its sleep state.
¶ Jockey Cutout Mode
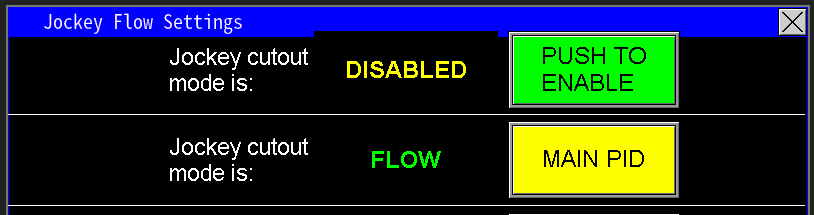
When the Jockey Cutout Mode is Disabled, the Jockey pump operates normally alongside the main pumps, depending on the station’s configuration. Some stations require the Jockey pump to run concurrently with the main pumps, while others only need it to activate during the station’s startup or sleep phases. Typically, most stations can operate without the Jockey pump running continuously, as its primary role is to assist with starting the station and transitioning it to sleep mode.
When the Jockey Cutout Mode is Enabled, you can configure the Jockey pump to start and stop based on either Flow or Main PID settings, as shown in Image 1.7. This allows for precise control tailored to the station’s operational needs.
|

|
¶ Jockey Cutout Mode is Flow
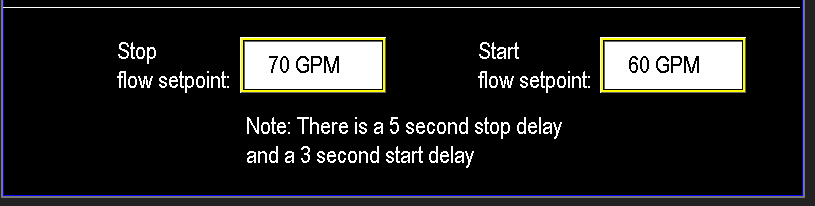
When the Jockey Cutout Mode is set to Flow (Image 1.7), the Flow Settings screen populates (Image 1.9), allowing you to configure the start and stop setpoints for the Jockey pump. In this configuration, the station waits until the flow reaches the Start Setpoint to activate the Jockey pump and the Stop Setpoint to deactivate it.
For example, if the flow meter reads 60 GPM or below, the Jockey pump will activate after a 3-second internal start delay. This is useful when the main pump is preparing to enter sleep mode or when the station is operating a smaller zone, allowing the Jockey pump to maintain lower pressure efficiently.
As the station wakes up or water demand increases, the Jockey pump is the first to activate or speed up. If pressure demands it, the main lead pump will engage a few seconds later, followed by the lag pumps. When the flow exceeds the Stop Setpoint for the Jockey pump, it will shut off after a 5-second internal stop delay, allowing the main pumps to take over and maintain the station’s pressure and flow. These setpoints are customizable to match the specific requirements of your pump station. Refer to the Omnia Manual for detailed instructions on configuring these flow settings for optimal performance.
¶ Jockey Cutout Mode is Main PID
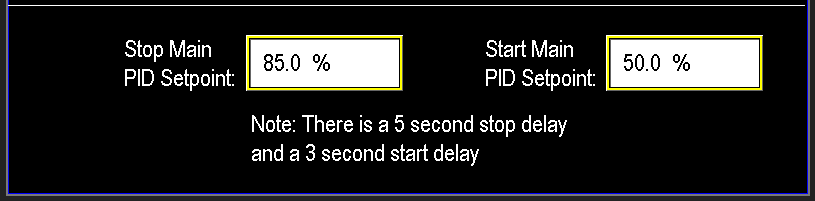
When the Jockey Cutout Mode is set to PID (Image 1.8), the PID Settings screen for the main pumps populates (Image 2.0), allowing the Jockey pump to start and stop based on the PID output demand of the main pumps.
In the example provided, if the main pump’s PID output is at or below 50%, the Jockey pump activates after a 3-second internal start delay. This setup is used when the main pump is preparing to enter sleep mode or when operating a smaller zone, enabling the Jockey pump to maintain lower pressure efficiently.
As the station wakes up or water demand increases, the Jockey pump is the first to activate or speed up. If pressure demands it, the main lead pump engages a few seconds later, followed by the lag pumps. When the main pump’s PID output exceeds the Stop Setpoint of 85%, the Jockey pump shuts off after a 5-second internal stop delay, allowing the main pumps to maintain the station’s pressure and flow. These setpoints are customizable to suit the specific requirements of your pump station.
All other settings for the intermediate pump are detailed in the Pump Settings section, which correspond to the settings of the other pumps.
¶ Other Pumps
Needing to view other pumps, click from the list below: